$38
Bendi Landoll 3 Wheel Electric VERY Narrow Aisle Forklift Troubleshooting & Maintenance Manual – PDF
Bendi Landoll 3 Wheel Electric VERY Narrow Aisle Forklift Troubleshooting & Maintenance Manual – PDF DOWNLOAD
The Bendi Landoll 3 Wheel Electric VERY Narrow Aisle Forklift Troubleshooting & Maintenance Manual offers concise guidance for troubleshooting and maintaining the forklift model. This PDF download ensures optimal performance and longevity in tight warehouse spaces.
FILE DETAILS:
Bendi Landoll 3 Wheel Electric VERY Narrow Aisle Forklift Troubleshooting & Maintenance Manual – PDF DOWNLOAD
Language : English
Pages :124
Downloadable : Yes
File Type : PDF
DESCRIPTION
Bendi Landoll 3 Wheel Electric VERY Narrow Aisle Forklift Troubleshooting & Maintenance Manual – PDF DOWNLOAD
Using This Manual
This B3 Series Model* Troubleshooting and Corrective Maintenance Manual is a guide to aid you in troubleshooting and correcting any problems you may have with your B3 Series Fork Lift Truck. It is designed to be used as a reference tool in your everyday use of this truck. The manual is divided into two sections. It is designed to work through the truck and any problem which may arise from the front to the back of the forklift.
Troubleshooting
When a problem develops, see this section for troubleshooting procedures, in chart form. Troubleshooting procedures are defined as battery problems, hydraulic problems, traction drive problems, brake problems, electrical problems, audible problems, and visible problems. Once the problem is isolated, see the next section, Corrective Maintenance, for the adjustment and/or repair instructions.
Corrective Maintenance
The corrective maintenance section details the maintenance procedures for your truck. These procedures include major adjustments, settings, mechanical, and electrical repairs which may need to addressed. These procedures are described in the section from the front to the rear of the truck.
IMAGES PREVIEW OF THE MANUAL:
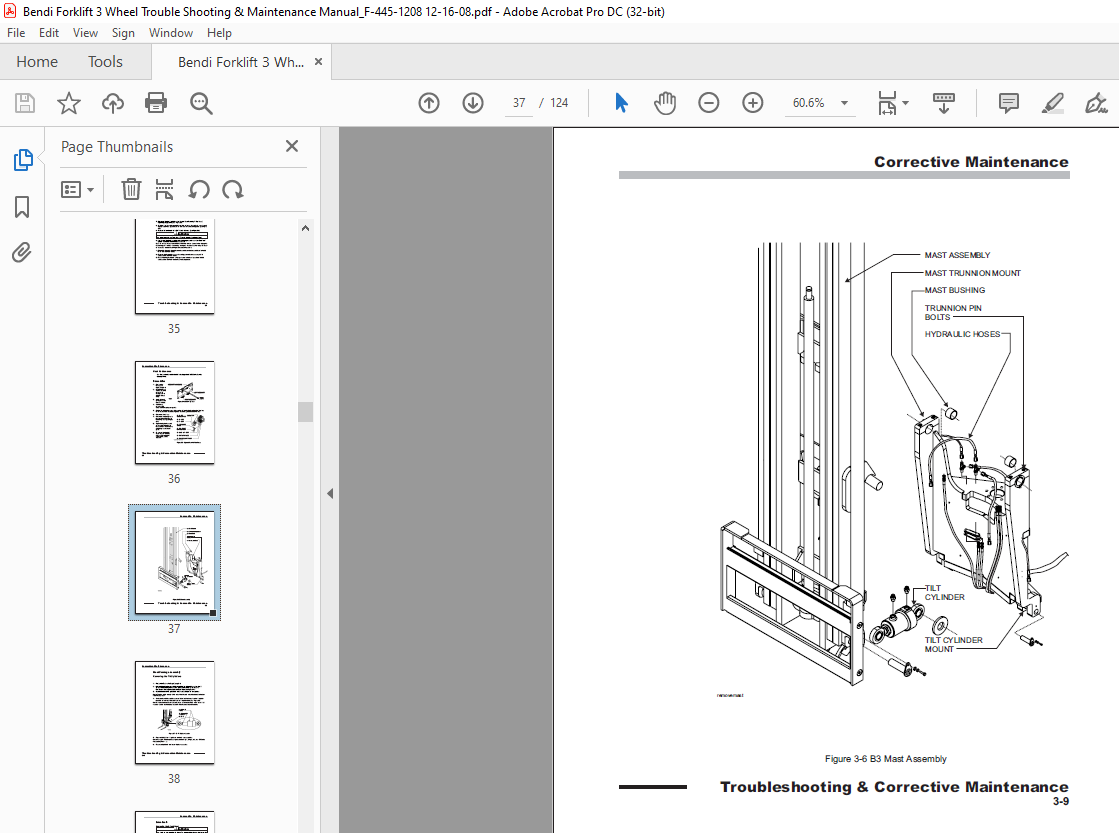

TABLE OF CONTENTS:
Bendi Landoll 3 Wheel Electric VERY Narrow Aisle Forklift Troubleshooting & Maintenance Manual – PDF DOWNLOAD
Using This Manual1-1
Troubleshooting 2-1
Preliminary Procedures 2-1
Curtis Troubleshooting 2-2
Drive Controller Problems 2-2
Hydraulic Problems 2-3
Brake Problems2-11
Electrical Problems2-13
Audible Problems 2-14
Visible Problems2-17
Corrective Maintenance 3-1
Introduction3-1
Tools Needed3-2
Before You Begin3-2
Lifting the Truck 3-3
Electrical Static Discharge 3-4
Cleaning and Inspection3-4
Forks3-5
Removing Forks 3-5
Repairing Forks3-5
Load Testing Forks 3-5
Mast3-6
Removing the Mast From the Truck 3-6
Mast Maintenance 3-8
Sideshifter3-8
Mast Carriage Assembly 3-10
Removing the Tilt Cylinders 3-10
Drive Train 3-11
Removing Drive Wheel 3-11
Traction Drive Motor and Gear Box 3-12
To Begin…3-12
Replacing the Gear Box 3-13
Replacing the Traction Drive Motor 3-14
Brake System 3-16
Brake Drum Assembly3-17
Disassembling and Inspecting Wheel Bearings 3-18
Assembling Wheel Bearings 3-19
Changing Brake Shoes 3-20
Replacing the Brake Shoe Assembly 3-22
Repairing Brake Wheel Cylinders3-24
Hydraulic Drum Brakes 3-25
Measure Diameter3-25
Replacing Brake Drum Assemblies 3-26
Parking Brake Assembly 3-27
Parking Brake Lever 3-27
Adjusting Parking Brake Lever3-28
Replacing Parking Brake Lever Assembly3-29
Parking Brake Switch3-30
Checking Parking Brake Switch 3-30
Replacing Parking Brake Switch 3-31
Replacing the Parking Brake Cable 3-32
Parking Brake Assembly 3-33
Adjusting Parking Brake 3-33
Changing Parking Brake Shoes or Replacing
Parking Brake Assembly 3-34
Replacing Any Other Hydraulic Brake Component 3-34
Troubleshooting & Corrective Maintenance
Brake Pedal Assembly 3-35
Drum Brakes 3-35
Brake Pedal 3-35
Service Brake Linkage3-36
Brake Light/Accelerator Switch 3-38
Brake Light/Accelerator Switch Adjustment 3-38
Brake Light/Accelerator Switch Replacement3-39
Master Cylinder 3-40
Replacing Master Cylinder3-40
Bench Bleed the Master Cylinder3-43
Bleeding Brakes 3-44
Service Brake Pedal Assembly 3-46
Accelerator Pedal Assembly3-46
Floor Plate Removal3-47
Adjusting Accelerator Pedal3-48
Replacing Accelerator Module 3-48
Motor Compartment3-50
Lift/Steer Motor and Pump 3-51
Hydraulic Return Filter3-52
Change Hydraulic Oil Filter 3-52
Steer Pump Relief Valve 3-53
Checking and/or Adjusting Pressure 3-53
Hydraulic Control Valve Assembly 3-56
General3-56
Hydraulic Control Valve and Switches3-59
Hydraulic Lift Pot 3-62
General3-62
To Adjust and/or Replace3-62
Steering Column/Dash Assembly 3-65
Remove Right Side Cover3-66
Display 3-67
Brush Wear Indicator (BWI) LED’s 3-67
Key Switch3-68
Option Rocker (On/Off) Switches 3-69
Steering Wheel 3-70
Steering Column (Console) 3-70
Steering Orbital Control Unit 3-72
Direction Control Lever 3-73
Replacing Direction Control Switch 3-73
Troubleshooting & Corrective Maintenance
Electrical System 3-74
Curtis Electrical Control Panel 3-74
1309 Parameter Install Tool3-74
Parameter Install Requirements3-75
Model 1311 Handset 3-76
Description3-76
Directions for use 3-76
Calibration of 1244 Accelerator Controller 3-77
Setting the Lift Pot3-78
Replacement 3-79
Replacing Complete Control Panel 3-79
Replacing Any Other Single Controller Component 3-79
Horn 3-84
Removing the Horn3-84
Replacing Hydraulic Tank 3-86
Seat Assembly 3-87
Seat Switch 3-87
Replacing the Switch and Cable 3-87
Overhead Guard, Lighting, and Alarms3-89
Lights 3-89
Back Up Alarms 3-90
Rotational Seals, Bearings or Steering Gear 3-88
Removing Steering Gear Only 3-92
Rotation Seals and Bearings 3-93
Hints for Reassembly 3-94
Hydraulic Fittings and Hoses 3-95
Notes 3-96
Troubleshooting &
More products