$33
Gleaner S9 Series Combine with AP84-4 & AP98-4 engines S96 S97 S98 Service Manual 79036910B – PDF
Gleaner S9 Series Combine with AP84-4 & AP98-4 engines S96 S97 S98 Service Manual 79036910B – PDF DOWNLOAD
FILE DETAILS:
Gleaner S9 Series Combine with AP84-4 & AP98-4 engines S96 S97 S98 Service Manual 79036910B – PDF DOWNLOAD
Language : English
Pages : 396
Downloadable : Yes
File Type : PDF
Size: 52.3 MB
IMAGES PREVIEW OF THE MANUAL:
DESCRIPTION:
Gleaner S9 Series Combine with AP84-4 & AP98-4 engines S96 S97 S98 Service Manual 79036910B – PDF DOWNLOAD
A word to the operator:
- It is your responsibility to read and understand the safety section in this manual and the manual for all implements before you operate this machine. You are responsible for your safety. Good safety procedures prevent injury to you and the persons around you.
- Make the information in the safety section of this manual a part of your safety procedure. This safety section is written only for this type of machine. Safety is your responsibility. You can prevent injury and death.
- This safety section gives basic safety examples that can occur during the operation and maintenance of your machine. This safety section is not a replacement for safety instruction in other sections of this manual.
- Injury or death can occur if the safety instruction is not obeyed. Learn how to operate the machine and how to use the controls correctly. Do not operate the machine if you do not know how to operate the machine. Do not let persons operate the machine that do not know how to operate the machine.
- Follow all safety instructions in the manuals and on the safety signs on the machine, the implements, and the attachments.
- Use only approved attachments and implements.
- Make sure that your machine has the correct equipment that is necessary by the local regulations.
This manual:
- This manual covers general safety practices for this machine. The operator manual must always be kept
with the machine. - Right-hand and left-hand, as used in this manual, are determined by facing the direction the machine will
travel when in use. - The photos, illustrations, and data used in this manual were current at the time of printing, but due to
possible in-line production changes, your machine can vary slightly in detail. The manufacturer reserves the
right to redesign and change the machine as necessary without notification.
Operation:
Prepare for operation:
- Read and understand all operating instructions and precautions in this manual before operating or servicing
the machine. - Make sure you know and understand the positions and operations of all controls. Make certain all controls
are in neutral and the park brake is applied before starting the machine. Make sure the steering wheel is
centered and locked. - Make certain all people are well away from your area of work before starting and operating the machine.
Check and learn all controls in an area clear of people and obstacles before starting your work. Be aware of
the machine size and have enough space available to allow for operation. Never operate the machine at
high speeds in crowded places. - Emphasize the importance of using correct procedures when working around and operating the machine.
Do not let children or unqualified persons operate the machine. Keep others, especially children, away from
your area of work. Do not permit others to ride on the machine. - Make sure the machine is in the proper operating condition as stated in the Operator Manual. Make sure
the machine has the correct equipment required by local regulations. - All equipment has a limit. Make sure you understand the speed, brakes, steering, stability, and load
characteristics of this equipment before you start.
TABLE OF CONTENTS:
Gleaner S9 Series Combine with AP84-4 & AP98-4 engines S96 S97 S98 Service Manual 79036910B – PDF DOWNLOAD
1 Safety 15
1 1 Introduction 17
1 1 1 Safety alert symbol 17
1 1 2 Safety messages 17
1 1 3 Informational messages 17
1 1 4 Safety signs 17
1 1 5 A word to the operator 18
1 1 6 This manual 19
1 2 Operation 20
1 2 1 Prepare for operation 20
1 2 2 General information 20
1 2 3 Personal protective equipment 21
1 2 4 Seat instructions 22
1 2 5 Shield and guards 22
1 2 6 Exhaust warning 23
1 2 7 Flying debris 23
1 2 8 Handrails 23
1 2 9 Agricultural chemicals 23
1 3 Travel on public roads 25
1 4 Maintenance 27
1 4 1 General maintenance information 27
1 4 2 Fire prevention and first aid 28
1 4 3 High pressure leaks 29
1 4 4 Engine safety 30
1 4 5 Fuel safety 31
1 4 5 1 Ultra-low sulfur diesel 32
1 4 6 Battery safety 32
1 4 7 Accumulator safety 33
1 4 8 Replacement parts 33
1 5 Safety and informational signs 34
1 5 1 Danger – Crushing hazard 37
1 5 2 Danger – Crushing hazard 37
1 5 3 Danger – Electrical hazard 37
1 5 4 Danger – Entanglement hazard 37
1 5 5 Danger – Entanglement hazard 38
1 5 6 Danger – Explosion hazard 38
1 5 7 Danger – Shearing hazard 38
1 5 8 Warning – Burn hazard 38
1 5 9 Warning – Bystander alert 39
1 5 10 Warning – Bystander alert 39
1 5 11 Warning – Crushing hazard 39
1 5 12 Warning – Entanglement hazard 39
1 5 13 Warning – Entanglement hazard 40
1 5 14 Warning – Fall hazard 40
1 5 15 Warning – Flying objects hazard 40
1 5 16 Warning – Operators manual 40
1 5 17 Warning – Seat belt 41
1 5 18 Warning – Seat belt 41
1 5 19 Warning – Shearing hazard 41
1 5 20 Warning – Shearing hazard 41
1 5 21 Slow Moving Vehicle (SMV) sign 42
59 Series Combine
790369108
Table of contents , •AGCO
Your Agriculture Company
1 5 22 Tire usage sign 42
1 5 23 Exit sign 42
2 Introduction 43
2 1 Introduction 45
2 1 1 Units of measurement 45
2 1 2 Replacement parts 45
2 1 3 Intended use 45
2 1 4 Proper disposal of waste 45
2 2 Machine identification 46
2 2 1 Serial number plate 46
2 2 2 Engine serial number 46
2 2 3 Serial number description 47
2 3 How the combine works 48
2 3 1 Headers 49
2 4 Header lift cylinder stop 50
2 4 1 Engaging the header lift cylinder stop 50
2 4 2 Disengaging the header lift cylinder stop 50
2 5 Component access 52
2 5 1 Installing the feeder house shield 52
2 5 2 Removing the feeder house shield 52
2 5 3 Opening the left-hand lower shield 52
2 5 4 Closing the left-hand lower shield 53
2 5 5 Opening the left-hand upper shield 53
2 5 6 Closing the left-hand upper shield 54
2 5 7 Opening the right-hand lower shield 54
2 5 8 Closing the right-hand lower shield 55
2 5 9 Opening the right-hand upper shield 55
2 5 1 O Closing the right-hand upper shield 56
2 5 11 Removing the mud shield 56
2 5 12 Installing the mud shield 56
2 5 13 Lowering the right-hand step 57
2 5 14 Opening the elevator access panel 57
2 5 15 Opening the rotary radiator screen 58
2 5 16 Opening the engine cover 58
2 5 17 Closing the engine cover 59
2 5 18 Accessing the threshing and the separating cage 59
2 6 California emission control warranty statement 61
2 7 United States and Canada emission control warranty statement 64
3 Operation 69
3 1 Checklists 75
3 1 1 New machine break-in 75
3 1 2 New engine break-in 75
3 1 3 Daily checklist 75
3 1 4 Before each season checklist 76
3 2 Engine 77
3 2 1 Starting the engine 77
3 2 2 Cold weather starting 78
3 2 3 Stopping the engine 78
3 2 4 Engine break-in 78
3 2 5 Engine operation with no load or low load 79
3 3 Hydrostatic transmission 80
3 3 1 Transmission gear selection 80
3 3 2 Ground speed lever 80
3 3 3 Warm-up procedure 80
59 Series Combine
790369108
AGCO
v ,,k,IM,Company Table of contents
3 3 4 Moving the machine forward 80
3 3 5 Moving the machine rearward 81
3 3 6 Stopping the machine 81
3 3 7 Rear wheel assist 81
3 4 Towing 83
3 4 1 Header towing 83
3 4 2 Machine towing 83
3 5 Machine transporting checklists 84
3 5 1 Machine preparation for driving on public roads 84
3 5 2 Machine preparation for transporting on a trailer 84
3 6 Pulling the machine from the mud 85
3 6 1 Pulling the machine forward from the mud 85
3 6 2 Pulling the machine rearward from the mud 85
3 7 Ladder 86
3 7 1 Cab ladder 86
3 7 2 Engine platform ladder 86
3 7 3 Grain tank ladder 87
3 8 Fire extinguisher 88
3 8 1 Fire extinguisher 88
3 9 Storage compartment 89
3 9 1 Storage compartment 89
3 10 Cab operation 90
3 10 1 Cab top view 90
3 10 2 Ignition switch 90
3 10 3 Turn signal 91
3 10 4 Horn 91
3 10 5 Trailer lamp malfunction indicator 91
3 10 6 Fuel level 92
3 10 7 Diesel exhaust fluid level 92
3 10 8 Cab interior lamp 92
3 10 9 Cab storage 93
3 10 10 Cooler, if equipped 93
3 10 11 Auxiliary power sockets 94
3 10 12 Front shade 94
3 10 13 Radio 94
3 10 14 Brake pedals 95
3 10 15 Adjusting the steering column fore and aft 95
3 10 16 Adjusting the steering column tilt 95
3 10 17 Adjusting the steering column up and down 96
3 10 18 Park brake 96
3 10 19 Power mirrors 96
3 10 20 Windscreen wiper 97
3 11 Console controls 98
3 11 1 Console controls 98
3 11 2 Engine speed dial 99
3 11 3 Ground speed lever controls 99
3 11 4 Header controls 100
3 11 5 Header engage switch 100
3 11 6 Park brake switch 100
3 11 7 Rear wheel assist switch 101
3 11 8 Thresher engage switch 101
3 11 9 Transport mode 101
3 12 Machine lamps 102
3 12 1 Field lamps and headlamps 102
3 12 2 Rear work and ladder lamps 102
3 12 3 Exit lamps 102
59 Series Combine
790369108
Table of contents , •AGCO
Your Agriculture Company
3 12 4 Beacon lamps 103
3 12 5 Row finder lamps 103
3 12 6 Flashing warning lamps 104
3 12 7 Service lamps 104
3 13 Terminal operation 107
3 13 1 Terminal overview 107
3 13 2 Data transfer 107
3 13 3 Adjusting the terminal 107
3 13 4 Video 108
3 13 5 Software upgrade 108
3 13 6 Terminal basics 108
3 13 6 1 Terminal display 108
3 13 6 2 External control panel 108
3 13 6 3 Screen layout 109
3 13 6 4 Navigation – control by touch 109
3 13 6 5 Navigation – quick jumps 110
3 13 6 6 Navigation – control with external control panel 110
3 13 6 7 Cleaning the terminal screen 110
3 13 6 8 Day/night mode on the terminal 110
3 13 6 9 Icon descriptions 111
3 14 Main screen overview 114
3 14 1 Customizing the main screen 114
3 15 Combine dashboard 115
3 15 1 Viewing alarms 115
3 15 2 Removing alarms 115
3 16 Machine settings and data 116
3 16 1 Changing the header settings 116
3 16 2 Changing the crop settings 116
3 16 3 Changing the leaf purge settings 117
3 16 4 Changing the ground speed settings 117
3 16 5 Changing the reel settings 118
3 16 6 Changing the yield settings 118
3 16 7 Changing the loss system settings 120
3 16 8 Shaft speeds screen 121
3 16 8 1 Changing the shaft speeds settings 121
3 16 9 Changing the system features 122
3 16 10 Combine maintenance information 123
3 16 11 Counters 123
3 16 12 Chaff spreader on/off 124
3 16 13 Engine reversing fan on/off 124
3 16 14 Leaf purge on/off 125
3 17 Calibrations 126
3 17 1 Calibrating the multifunction armrest 126
3 17 2 Calibrating the header 126
3 17 3 Calibrating the reel 127
3 17 4 Calibrating the processor and cleaning system 127
3 17 5 Calibrating the manual shaft 128
3 17 6 Calibrating the ground drive 129
3 18 Info+ 131
3 18 1 Harvest data 131
3 18 2 Losses 132
3 18 3 Header 132
3 18 4 Engine 132
3 18 5 Engine 2 133
3 18 6 Shafts 133
3 18 7 Chopper 133
3 19 Camera 134
59 Series Combine
790369108
AGCO
v ,,k,IM,Company Table of contents
3 19 1 Showing the camera on the terminal 134
3 19 2 Changing between multiple cameras 134
3 19 3 Showing the camera image while reversing 134
3 19 4 Opening the camera full-screen image 135
3 19 5 Adjusting the brightness 135
3 19 6 Adjusting the contrast 136
3 19 7 Adjusting the col or saturation 136
3 20 Diagnostics 138
3 20 1 Setting the alarms 138
3 21 Configuring the terminal for the Agleader yield monitor 140
3 21 1 Start calibration screen 141
3 21 2 Run screen 141
3 21 3 Calibration screen 142
3 21 4 Diagnostic screen 142
3 21 5 Calibrations 143
3 21 5 1 Doing the vibration calibration 143
3 21 5 2 Doing the yield calibration 144
3 21 5 3 Doing the moisture calibration 145
3 21 5 4 Doing the temperature calibration 146
3 21 5 5 Changing the crop type 146
3 21 5 6 Changing the crop density 146
3 21 5 7 Changing the yield type 147
3 22 Leaf screen 148
3 22 1 Cleaning fan leaf screen 148
3 22 2 Opening the cleaning fan leaf screen 148
3 22 3 Closing the cleaning fan leaf screen 149
3 22 4 Transmission leaf screen 149
3 22 5 Opening the transmission leaf screen 149
3 22 6 Closing the transmission leaf screen 149
3 23 Feeder 151
3 23 1 Header electro-magnetic clutch 151
3 23 2 Operating the header/feeder reverser 152
3 23 3 Setting the feeder speed 152
3 23 4 Setting the feeder speed for the corn headers 153
3 24 Variable speed corn header drive 155
3 25 Threshing cylinder 156
3 25 1 Cylinder drive 156
3 25 2 Cylinder gearbox shift lever 156
3 26 Threshing 157
3 26 1 Filler bars 157
3 26 2 Concave wires 157
3 26 3 Separator cage cover 157
3 26 4 Installing the separator cage cover 158
3 26 5 Removing the separator cage cover 158
3 27 Cleaning system 160
3 27 1 Cleaning shoe 160
3 27 2 Cleaning shoe tailboard 160
3 27 3 Opening the cleaning shoe tailboard 160
3 27 4 Closing the cleaning shoe tailboard 161
3 27 5 Adjustable chaffer 161
3 27 6 Optional chaffers 162
3 27 7 Adjustable sieve 163
3 27 8 Adjusting the sieve and chaffer 163
3 27 9 Optional sieves 164
3 27 10 Cleaning fan 164
3 27 11 Light seeds kit 165
59 Series Combine
790369108
Table of contents , •AGCO
Your Agriculture Company
3 28 Grain tank 166
3 28 1 Grain tank cross auger cover 166
3 28 2 Grain tank unloading system 166
3 28 3 Grain tank level sensor 167
3 28 4 Grain tank sample 167
3 28 5 Grain tank extensions 167
3 28 6 Opening the grain tank extensions 167
3 28 7 Closing the grain tank extensions 168
3 28 8 Yield sensor 169
3 28 9 Mositure sensor 169
3 29 Discharge system 170
3 29 1 Hydraulic straw spreader 170
3 29 2 Straw spreader guard 170
3 29 3 Chaff spreader 170
3 29 4 Moving the chaff spreader to the maintenance position 171
3 29 5 Straw chopper 171
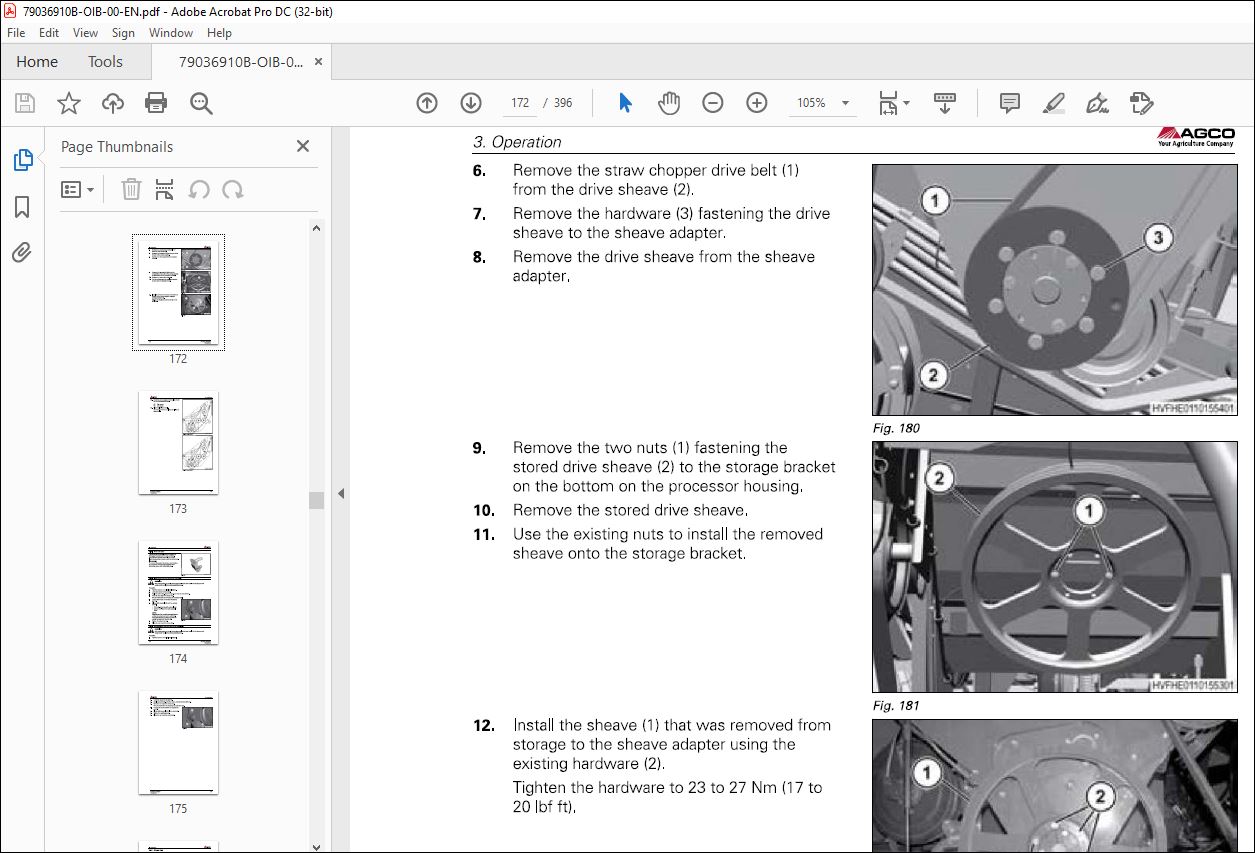
3 29 6 Adjusting the straw chopper speed 171
3 29 7 Fine cut knife 174
3 29 8 Engaging the fine cut knife assembly 174
3 29 9 Disengaging the fine cut knife assembly 174
3 30 Stone trap 176
3 30 1 Opening the stone trap door 176
3 30 2 Closing the stone trap door 176
3 31 Seat 178
3 31 1 Seat belts 178
3 31 2 Instructor seat 178
3 31 3 Deluxe operator seat 179
3 31 4 Standard operator seat 179
3 32 Automatic climate control system 180
3 32 1 Operation 180
3 32 2 Automatic control 180
3 32 3 Temperature 180
3 32 4 Air conditioner 181
3 32 5 Blower speed 181
3 33 Hydraulic system 182
3 33 1 Hydraulic system overview 182
3 33 2 Hydraulic pump 182
3 33 3 Steering priority valve 183
3 33 4 Hydraulic single point connector 183
3 33 5 Hydraulic accumulator 184
3 33 6 Accumulator valve 184
3 33 7 Lateral tilt valve 185
3 33 8 Main hydraulic control valve port location 185
3 33 9 Main hydraulic control valve solenoid and speed adjustment location 186
3 33 10 Park brake control valve 187
3 34 Headers 189
3 34 1 Installing the header to the combine 189
3 34 2 Removing the header from the combine 191
3 35 Initial combine settings 193
3 36 Performance adjustments 194
3 36 1 Adjustment procedure tips 194
3 36 2 Corn header harvesting tips 196
3 36 3 Additional help 197
3 37 Field service tips 198
3 38 Seed loss 209
3 38 1 Grain loss 209
59 Series Combine
790369108
AGCO
Your Agriculture Company Table of contents
3 38 2 Corn loss 211
4 Maintenance 217
4 1 Service schedule 221
4 2 General information 225
4 2 1 Inspection during lubrication 225
4 2 2 Sealed bearings 225
4 2 3 After service work 225
4 3 Lubrication points 226
4 3 1 Left-hand side of machine 226
4 3 2 Right-hand side of machine 229
4 3 3 Automatic lubrication 234
4 4 Roller chain maintenance 238
4 5 Engine oil 239
4 5 1 Checking the engine oil level 239
4 5 2 Changing the engine oil and filter 239
4 6 Engine air filter 241
4 6 1 Cleaning the engine air cleaner screen 241
4 6 2 Aspirated air pre-cleaner 241
4 6 3 Air filter restriction switch 242
4 6 4 Engine air filters 242
4 6 5 Cleaning the primary element 242
4 6 6 Replacing the primary element 242
4 6 7 Replacing the secondary element 243
4 7 Fuel system 244
4 7 1 Fuel fill location 244
4 7 2 Fuel handling 244
4 7 3 Fuel valve 245
4 7 4 Fuel vent breather 245
4 7 5 Removing the water from the fuel system 245
4 7 6 Replacing the fuel filters 246
4 7 7 Replacing the auxiliary fuel filter 247
4 7 8 Bleeding the fuel system 247
4 8 Diesel exhaust fluid (DEF) 248
4 8 1 Description of the selective catalytic reduction system 248
4 8 2 DEF storage and shelf life 249
4 8 3 Changing the diesel exhaust fluid filter 249
4 8 4 Draining the diesel exhaust fluid tank 251
4 9 Engine belts 252
4 9 1 Belt maintenance 252
4 9 2 Belt adjustment 252
4 9 3 Aspirator drive belt 252
4 9 4 Removing the aspirator drive belt 253
4 9 5 Installing the aspirator drive belt 254
4 9 6 Compressor drive belt 255
4 9 7 Removing the compressor drive belt 255
4 9 8 Installing the air conditioning compressor drive belt 256
4 9 9 Removing the alternator belt 257
4 9 10 Installing the alternator belt 258
4 10 Engine cooling system 260
4 10 1 Engine cooling fan 260
4 10 2 Engine cooling system coolant 260
4 10 3 Coolant level 260
4 10 4 Coolant mixture 261
4 10 5 Changing the engine coolant 261
4 11 Air conditioning system 263
59 Series Combine
790369108
Table of contents , •AGCO
Your Agriculture Company
4 11 1 Compressor 263
4 11 2 Condensor 263
4 12 Cab air filter 264
4 12 1 Primary cab air filter 264
4 12 2 Cab recirculation filter 264
4 12 3 Cleaning the cab air filter 264
4 13 Cleaning the windscreen 266
4 14 Hydraulic system 267
4 14 1 Hydraulic oil level 267
4 14 2 Changing the suction filter for the propel pump 267
4 14 3 Changing the hydro return filter 268
4 14 4 Changing the hydraulic oil 269
4 14 5 Removing air from the hydraulic system 271
4 14 6 Checking the accumulator gas pressure 271
4 14 7 Hydrostatic oil cooler 272
4 15 Electrical system 273
4 15 1 Battery 273
4 15 2 Accessing the batteries from the engine compartment 273
4 15 3 Accessing the batteries from the outside of the machine 274
4 15 4 Battery disconnect switch 274
4 15 5 Battery jump post 274
4 15 6 Starting with a booster battery 275
4 15 7 Alternator 276
4 15 8 Starter 276
4 15 9 Lighting system and reflector maintenance 276
4 15 10 Replacing the standard front work lamp bulbs 276
4 15 11 Replacing the dome lamp 277
4 15 12 Adjusting the cab lamp 277
4 15 13 EDT diagnostics connectors 278
4 16 Ground locations 279
4 17 Front electrical distribution center 281
4 17 1 HCDM1 281
4 17 2 EXT controller 282
4 18 Rear electrical distribution center 283
4 18 1 Fuse block 283
4 18 1 1 PDC 283
4 18 1 2 HCDM2 284
4 19 Cab electrical distribution center 286
4 19 1 CEDC 286
4 20 Transmission 289
4 20 1 Checking the transmission fluid level 289
4 20 2 Changing the transmission fluid 289
4 21 Final drive 291
4 21 1 Checking the final drive fluid level 291
4 21 2 Changing the final drive fluid 291
4 22 Cylinder gearbox 293
4 22 1 Checking the cylinder gearbox fluid level 293
4 22 2 Changing the cylinder gearbox fluid 293
4 23 Wheels and tires 295
4 23 1 Tire pressure 295
4 23 2 Wheel bolt torque 295
4 23 3 Dual tires 295
4 23 4 Sidehill use 295
4 23 5 Care of tires 295
4 23 6 Tire repair 295
4 23 7 Removing the front drive wheel 295
59 Series Combine
790369108
AGCO
Your Agriculture Company Table of contents
4 23 8 Installing the front drive wheel 296
4 23 9 Removing the rear wheel 297
4 23 10 Installing the rear wheel 298
4 24 Concave 299
4 24 1 Removing the concaves 299
4 24 2 Installing the concaves 300
4 24 3 Levelling the concaves 301
4 24 4 Removing the concave wires 302
4 24 5 Installing the concave wires 303
4 24 6 Removing the concave filler plates 303
4 24 7 Installing the concave filler plates 304
4 25 Chaffer and sieve 305
4 25 1 Installing the chaffer 305
4 25 2 Installing the sieve 305
4 25 3 Removing the chaffer 306
4 25 4 Removing the sieve 307
4 26 Chopper knives 309
4 26 1 Removing the chopper knives 309
4 26 2 Installing the chopper knives 310
4 27 Drive alignment 311
4 27 1 Sheave Alignment 311
4 27 2 Idler Alignment 311
4 28 Drive belts and chains 313
4 28 1 Care of Belts 313
4 28 2 V-Belt Installation 313
4 28 3 Care of Chains 314
4 29 Left-hand drives 315
4 29 1 Main drive idler spring 315
4 29 2 Adjusting the main drive idler 315
4 29 3 Left-hand pivot shaft drive idler spring 316
4 29 4 Adjusting the left-hand pivot shaft drive idler spring 316
4 29 5 Unloader drive idler spring 317
4 29 6 Adjusting the unloader drive idler 317
4 29 7 Adjusting the shoe drive 318
4 29 8 Adjusting the impeller drive idler spring 318
4 29 9 Adjusting the straw chopper idler spring 319
4 29 10 Adjusting the clean grain elevator idler 319
4 29 11 Adjusting the unloader drive chain 320
4 30 Right-hand drives 321
4 30 1 Adjusting the separator drive idler spring 321
4 30 2 Elevator jackshaft idler spring 321
4 30 3 Adjusting the elevator jackshaft idler spring 321
4 30 4 Variable speed cylinder drive belt 322
4 30 5 Adjusting the rear feed conveyor drive idler spring 322
4 30 6 Adjusting the tailings return drive idler 323
4 30 7 Tailings return drive idler spring 323
4 30 8 Adjusting the cleaning fan and accelerator roll belt 324
4 31 Feederhouse 325
4 31 1 Adjusting the single speed header drive idler spring 325
4 31 2 Adjusting the variable speed header drive idler 325
4 31 3 Adjusting the right-hand pivot shaft driver idler spring 326
4 31 4 Feed conveyor chains 326
4 31 5 Front feed conveyor 327
4 31 6 Adjusting the feed conveyor chain springs 327
4 31 7 Removing or adding chain half-links to the front feed conveyor chain 328
4 31 8 Removing or adding chain half-links to the rear feed conveyor chain 328
4 31 9 Adjusting the feeder reverser drive chain 329
59 Series Combine
4 31 10 Feed drum blocks 329
4 31 11 Adjusting the feed drum blocks 329
4 32 Accelerator rolls 331
4 32 1 Adjusting the accelerator rolls 331
4 33 Shoe guides 332
4 33 1 Adjusting the cleaning shoe guides 332
4 34 Grain elevators 333
4 34 1 Adjusting the clean grain elevator conveyor chain 333
4 34 2 Adjusting the tailings elevator conveyor chain 333
4 35 Grain tank 334
4 35 1 Cross auger cover 334
4 35 2 Adjusting the cross auger cover 334
4 36 Grain tank unloader 335
4 36 1 Adjusting the swing cylinder 335
4 36 2 Un loader tube swing proximity sensor 335
4 36 3 Adjusting the cradle proximity sensor 335
4 37 Chaff spreader 337
4 37 1 Adjusting the chaff spreader board 337
4 38 Straw spreader 338
4 38 1 Straw spreader paddles 338
4 39 Rotary radiator screen adjustment 339
4 40 Sensors and switches 340
4 40 1 Sensors and switches locations and specificiations 340
4 41 Speed adjustment 341
4 41 1 Adjusting the header lift speed 341
4 41 2 Adjusting the header lowering speed 341
4 41 3 Adjusting the chaff spreader speed 342
4 41 4 Adjusting the rotary screen speed 342
4 42 Axles 344
4 42 1 Front Axle 344
4 42 2 Rear Axle 344
4 42 3 Adjusting the standard rear axle tread width 344
4 42 4 Adjusting the rear wheel assist axle tread width 346
4 42 5 Wheel adjustment 347
4 42 5 1 Adjusting the rear wheel assist wheel stops 347
4 42 5 2 Adjusting the standard rear axle wheel stop 348
4 42 5 3 Adjusting the wheel toe-in 348
4 43 Brakes 350
4 43 1 Master cylinder reservoir 350
4 43 2 Adjusting the master cylinder 350
4 43 3 Adjusting the park brake 351
4 44 Storage 352
4 44 1 Preparation for use after storage 352
5 Troubleshooting 355
5 1 Engine troubleshooting 357
5 2 Hydrostatic propulsion troubleshooting 358
5 3 Terminal troubleshooting 360
5 4 Yield sensor troubleshooting 361
6 Specifications 363
6 1 General specifications 365
6 1 1 Weight specifications 365
6 1 2 Wheel torque specifications 365
6 1 3 Machine system specifications 365
59 Series Combine
6 1 4 Cab specifications 367
6 1 5 Climate control specifications 368
6 1 6 Brake specifications 369
6 1 7 Electrical specifications 369
6 1 8 Engine specifications 369
6 1 9 Hydraulic system specifications 370
6 1 10 Lubrication specifications 371
6 1 11 Machine drive specifications 373
6 1 12 Machine lamp specifications 373
6 1 13 Steering axle specifications 374
6 1 14 Tire specifications 37 4
6 1 14 1 Drive tires 374
6 1 14 2 Dual drive tires 375
6 1 14 3 Adjustable steering axle tires 375
6 1 14 4 Rear wheel assist steering tires 375
7 Accessories 377
7 1 Accessories 379
8 Assembly 381
8 1 Assembly 383
8 1 1 Unloading the machine 383
8 1 2 Tire pressure 383
8 1 3 Checking the wheel nut torque 383
8 1 4 Adjusting the cab mirrors 383
8 1 5 Connecting the hydraulic driven straw spreader 383
8 1 6 Installing the fire extinguisher 384
8 1 7 Installing the unloader auger spout 384
8 1 8 Lowering the straw spreader guard 385
8 1 9 Washing the machine 385
9 Index 387
More products