$31.95
Hyundai HR110/120/140C-9 (Tier4F) Operator's & Service Manual - PDF
Hyundai HR110/120/140C-9 (Tier4F) Operator’s & Service Manual – PDF DOWNLOAD
FILE DETAILS:
Hyundai HR110/120/140C-9 (Tier4F) Operator’s & Service Manual – PDF DOWNLOAD
Language : English
Pages :138
Downloadable : Yes
File Type : PDF
TABLE OF CONTENTS:
Hyundai HR110/120/140C-9 (Tier4F) Operator’s & Service Manual – PDF DOWNLOAD
Operating & maintenance manual
Table of contents 1
1 Machine designation, manufacturer and notes 8
11 Machine designation and intended use 8
111 Intended purpose and designated use 8
12 Manufacturer 8
121 Name and address of the manufacturer 8
122 Contact 8
13 Type plate and serial number 9
131 Type plate labeling and serial number 9
14 EC Declaration of Conformity 10
15 User instructions 11
151 Responsibility of the contractor 11
152 Responsibility of the driver and the service staff 11
16 Change in ownership (eg by selling the compaction roller) 11
17 Notes on this operating and maintenance manual 12
171 Symbols in the operating and maintenance manual 12
172 Further notes on this operating and maintenance manual 13
18 Vibrations 13
181 Hand and arm vibration 13
182 Whole-body vibration 132 Safety instructions 14
21 General use of the compaction roller 14
22 Working with the compaction roller 15
23 Safety instructions in emergencies 153 Technical specifications 16
31 Operating data 16
32 Tires 16
33 Fill levels 17
34 Diesel engine Deutz (EU2) 17
35 Diesel engine Deutz (EU3) 17
36 Diesel engine Cummins (EU4) 17
37 Diesel engine Deutz (EU5) 17
38 Roll-over protection system (ROPS) 18
39 Warranty for add-ons and conversions 18
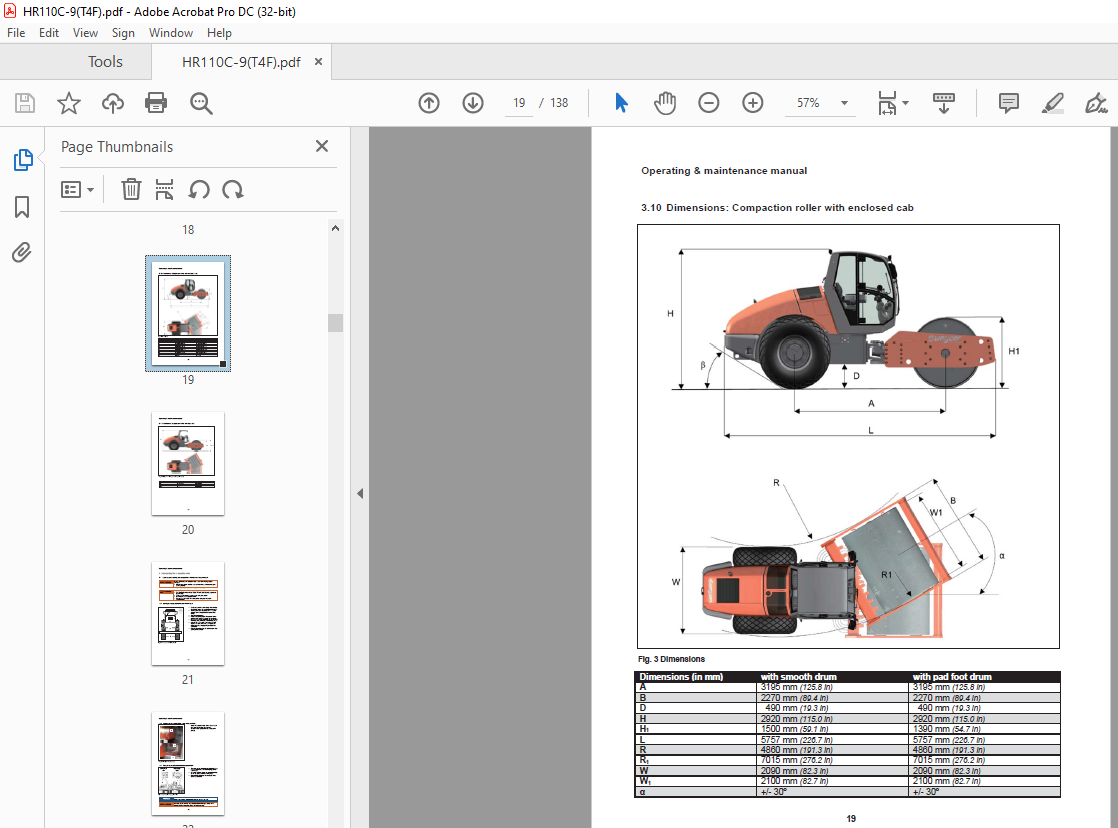
310 Dimensions: Compaction roller with enclosed cab 19
311 Dimensions: Compaction roller with open cab 204 Transporting the compaction roller 21
41 Securing and loading the compaction roller before transporting it 21
411 Loading the compaction roller onto a flat bed truck 21
412 Securing the compaction roller on the transport vehicle 22
Operating & maintenance manual
413 Tying the compaction roller to the transport vehicle 22
414 Carrying out the transport 235 Getting acquainted with the compaction roller 24
51 Overview: Assembly groups 24
52 Overview: Operator’s station with enclosed cab 25
53 Overview operator’s station with open cab 26
54 Warning notices and labels 276 Before starting the compaction roller 28
61 Prior to the initial start 28
62 Checking the compaction roller: Visual inspection 28
621 Checking the drum area 29
63 Refueling (Diesel) 30
64 With Diesel engines EU4 and EU5 only: Refueling (AdBlue® / DEF) 30
641 AdBlue® / DEF: Warning displays 32
65 Opening the door and accessing the vehicle 33
651 Opening and closing the window 34
652 Opening the door 347 Individual settings 35
71 Adjusting the driver’s seat 35
711 Longitudinal adjustment 36
712 Position of the backrest 36
713 Rotation of the driver’s seat 36
714 Left armrest 37
715 Backrest extension (headrest) 37
72 Adjustable steering column 38
721 Adjusting the exterior mirrors 38
722 Fastening the safety belt 398 Control elements and displays in the cab 40
81 Dashboard 40
811 Status and error messages 41
812 Regeneration of the Diesel engine 42
813 Control emements on the steering column 43
814 Warning features 44
815 Joystick and panel of switches in the right armrest 44
816 Functions of the joystick 45
817 Control panel in the right armrest 45
818 Panel of switches below the roof of the enclosed cab 46
819 Heating & ventilation 46
8110 Distribution of air in the enclosed cab 47Operating & maintenance manual
9 Starting, driving and stopping the compaction roller 48
91 Prior to the initial start 48
911 Activating the battery main switch (optional feature) 48
92 Starting the Diesel engine 48
921 Trouble-shooting: Diesel engine start 49
93 Driving the compaction roller 49
931 Forward motion: start 49
932 Forward motion: stop 50
933 Reverse motion: start 50
934 Reverse motion: stop 51
935 Changing direction 51
94 Driving in the rain 52
941 Front wiper 52
942 Rear wiper 52
95 Driving in the dark or with restricted visibility 52
951 Work lights 52
952 Taking action against fogged up or icy windows 53
953 Heating & ventilation 53
954 Line-of-sight obstruction 53
96 Stopping and parking the compaction roller 54
961 Turning off the battery main switch (optional feature) 54
962 Leaving the compaction roller 5410 Driving on heavy soils and on slopes 55
101 Optional automatic traction control 55
1011 Override function: Drum (optional feature) 55
1012 Override function: Rear axle (optional feature) 5611 Driving on slopes 57
111 Slopes 57
1111 Maximum gradeability of the compaction rollers (depending on the ground) 57
1112 Operation on slopes: Start 57
1113 Driving uphill with the roller drum ahead 58
1114 Driving uphill with the rear end ahead 58
1115 Driving downhill 59
1116 Stopping the operation on slopes 5912 Towing the compaction roller 60
121 Safety instructions referring to the towing process 60
122 Measures to be taken prior to towing 60
1222 Releasing the parking brake and the HP valves 61
1223 Deactivating (releasing) the parking brake 61Operating & maintenance manual
123 Carrying out the towing process 62
1231 After towing 6213 Working with the compaction roller 64
131 Control elements related to working 64
132 Fields of application of the compaction roller 65
1321 Basic information on soil compaction 65
1322 Simple operation: Forward motion (without vibration) 66
1323 Simple operation: Reverse motion (without vibration) 66
133 Soil compaction by means of the smooth roller drum 67
1331 Surface soil compaction 67
1332 Stopping the surface soil compaction 68
1333 Deep soil compaction 69
1334 Stopping the deep soil compaction 70
134 Soil compaction with the pad foot drum 70
1341 Basic information on the fields of application of the pad foot drum 7014 Compaction measurement (optional feature) 71
141 Variants of the compaction measurement system 71
1411 Advantages of compaction measurement 71
142 Analog display 72
143 Display of the compaction measurement system without data storage 73
144 Optional recording and documentation of the compaction work 73
1441 Installing and dismantling the compaction measurement system 74
145 Compaction measurement system with dynamic compaction control 7415 Conversion from a smooth drum to a pad foot drum 75
1511 Mounting the pad foot segments on a smooth roller drum 7616 Tires on the rear axle 78
1611 Water filling of the tires (optional) 78
1612 Filling procedure: Water and antifreeze additive 78
1613 Filling procedure: Pure water 79
1614 Emptying the tires 79
1615 Filling procedure: Using the ”Hanauer Maus“ 80
1616 Checking the tire inflation pressure 80
1617 Mounting the tires 8017 Failures and trouble shooting 8118 Maintenance instructions 83
181 Safety instructions referring to maintenance work 83
1811 Safety precautions to be taken prior to maintenance work 83Operating & maintenance manual
1812 After completing maintenance work 84
182 Overview: Maintenance 8519 Maintenance instructions for the driver 86
1911 Spare parts required for maintenance work: Maintenance kits 86
1912 Table of lubricants 8620 Maintenance certificate A: Maintenance work to be performed by the driver 87
201 Check list: Required maintenance work for maintenance certificate A 87
202 Maintenance certificate A: Daily checks and procedures 88
2021 Cleaning and inspecting the compaction roller 88
Prior to any operation of the compaction roller: 88
2022 Checking the Diesel fuel level 88
2023 Checking the AdBlue® / DEF level (applies to emission stage EU4 and EU5 machines only) 88
2024 Water-fuel separator 89
2025 Coolant level 89
2026 V-belt tension 90
2027 Engine oil level 90
2028 Hydraulic oil level 91
2029 Air filter 91
20210 Check the tire inflation pressure 92
20211 Windshield washer system 92
20212 Cleaning the cab 92
20213 Cleaning the scrapers 92 Maintenance certificates B & C: Maintenance work to be performed by
service staff 93
211 Maintenance work referring to the Diesel engine 94
2111 Water-fuel separator 94
2112 Replacing the filter cartridge and the fuel filter 95
2113 Engine oil change 95
2114 Topping up on engine oil 96
2115 Cooling system 96
2116 V-belt tension 97
2117 Replacing the combustion air filter 97
212 Maintenance work referring to the hydraulic system 98
2121 Hydraulic oil and oil filter cartridge 98
2122 Checking the hydraulic oil level 98
2123 Hydraulic oil change 99
213 Maintenance work referring to the rear axle 100
2131 Checking the oil level in the wheel drives and changing oil 100
2132 Oil level check and oil change in the rear axle 101
2133 Replacing the oil in the axle housing 101
214 Maintenance work referring to the drum and vibration drive 102
Operating & maintenance manual
2141 Oil level check: drum drive 102
2142 Oil level check: vibration drive 102
215 Maintenance work referring to the electrical system 103
2151 Maintenance work related to the battery 103
2152 Printed circuit board, fuses and relays 103
2153 Allocation of the fuses on the printed circuit board (Deutz BF4M2012C EU2) 104
2154 Allocation of the fuses on the printed circuit board (Deutz TCD2012 EU3) 104
2155 Allocation of the fuses on the printed circuit board (Cummins QSF38 TIER4Final EU4) 105
2156 Allocation of the fuses on the printed circuit board (Deutz TCD 36 EU5) 106
216 Maintenance work referring to the ventilation system 106
22 Storage and preservation 107
221 Long-term storage 107
222 Final shutdown of the compaction roller 107
23 Initial operation 108
231 Delivery receipt of the compaction roller 108
2311 Checking the operating state of the compaction roller 108
232 Instruction and demonstration at the machine 109
2321 Vehicle documents and operating manual 109
2322 Operating elements and displays in the cab 109
2323 Working with the compaction roller 109
2324 Driving the compaction roller 109
2325 Maintenance work 109
233 Check list: First inspection after the initial 50 operating hours 111
2331 Fill levels 111
2332 Diesel engine 111
2333 Screw connections 111
2334 Hydraulic system 112
24 Note of delivery and verification of inspections 113
241 Note of delivery 113
242 Verification: First inspection after 50 operating hours 114
243 Verification: Correct delivery procedure and execution of all lubrication &
maintenance work 115
25 Table of figures 116
26 Index 117
27 Electrical circuits 11
IMAGES PREVIEW OF THE MANUAL:
More products